Making A Welded Cable Dinner Knife
Last updated 04/11/2003
Click thumbnails to view full sized image.
Please Note, these instructions assume you have already welded your cable billet and made the spoon as shown on other pages on this site.
After you have flattened your cable billet,
you first want to form the handle. For the cable dinner knife, the handle and
the tang of the blade are one in the same. This is known as an integral handled
knife, in blade making terms. Leaving three to four inches of the billet to form
the blade, you are going to draw the rest of the billet out into a 1/4 x 1/4
inch handle. Bring the billet up to close to a welding heat (you always want to
work cable at this heat to prevent weld separation. Lay what will become the
back of the knife across the table of the anvil an use the peen and face of your
straight peen hammer to draw the handle out. Leave the handle square while you
forge the rest of the knife.

Next forge the tip of the knife. Working near the corner of the anvil (to reduce the risk of the corner of the hammer hitting the anvil face). Strike
the back of the blade while lifting the tang to round the tip. This will also cause the tip to drop down somewhat. Don't worry the tip will come back
up as you forge the edge.

The next bit is tricky. That is forging the edge bevel. Remember you don't want to forge it all the way out. As you will need to leave enough metal to
clean it up at the grinder. If this is one of your first knives, forming it 70% at the forge and
30% at the grinder is a good goal to work towards. With
more practice you can find what percentage works for you. Some master smiths leave so few hammer marks and so little scarf, that they can forge the blade
90% to shape. But they all spend some time at the grinder.
Start by curving the blade slightly towards the edge side. Put the curve in by working it over the horn of the anvil. The blade will try to curve away
from the edge as you forge the bevel in. That means if you curve it the
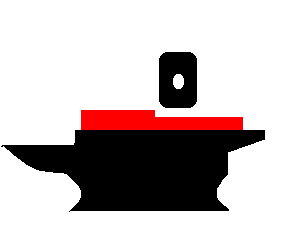
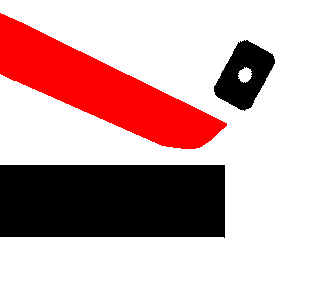
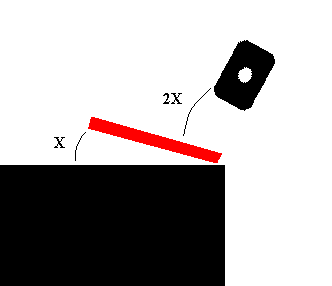
right amount to begin with, you will end up with a straight blade. Lay what will be the blade edge along the edge of the anvil (this is so you will not
strike the anvil face with the lower corner of the hammer face). Lift the back edge of the blade, so that the blade is at a slight angle to the anvil
face. Double that angle whit the hammer face and the direction of the hammer blows as you forge in the bevel. In the illustrations, only work that
portion of the blade out lined in gray and filled with gray "X"'s.
As you come to the tip you need to also curve the tang away from the anvil edge as
you hold blade angle.


Now that the blade is rough formed, take it to the grinder and do your clean-up grinding on the handle.
You want to make sure your handle is as smooth as possible before you twist it. This is also a good time to do any clean-up
grinding on the profile of the blade. Save the grinding on the bevel and edge till after heat treat. After you are done grinding, go back to the
forge and twist the handle and form the little hook on the back, like you did with the spoon. With that done it's time to heat treat the knife.
After you heat treat the knife, finish grinding the bevel, edge and the plunge lines. The polish and etch the knife just like you did the spoon.
For More Information Contact the Author via e-mail.