Forging
a Spoon
For this project we will use ½” 1018 steel bar stock. 1018
steel is a low carbon steel that will work not that much differently then iron.
Or you can use a billet of welded cable as shown elsewhere on this site. The first step in the project is the cut our steel to length. Now if I were a
period smith working in my own shop, I might leave the bar full length and cut
the spoon off the end of the bar once I was done. However that would make
drawing out the handle somewhat tricky. So we will cut our steel to approximatly
six inches on length.
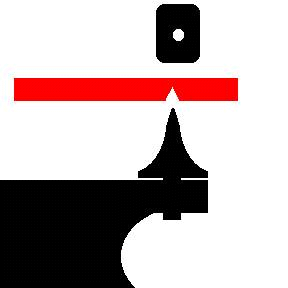
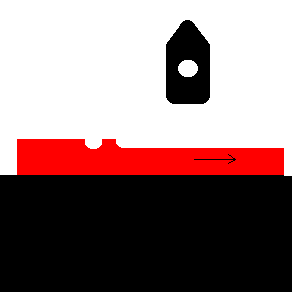
You hot cut steel in order to preserve material. Sawing removes a small amount of the metal as part of the saw curf. Also hot cutting is faster then cutting the metal using a hand saw. For both these reasons, period smiths would hot cut their iron stock. Hot Cutting is done using a chisel or a hot cut hardy tool. With either tool, care must be taken to not scar the anvil or the hammer face. When using a chisel, do not cut on the anvil face. Use either the cutting pad of the anvil or place a cutting plate over the anvil face. With both tools you want to cut a little over ¾ of the way through the piece and then turn it over to complete the cut.
 or
or 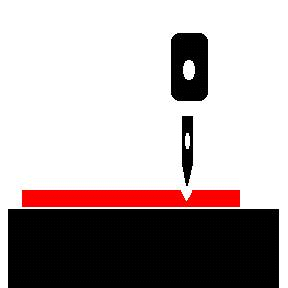
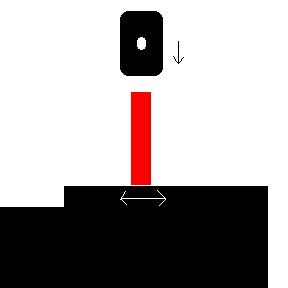
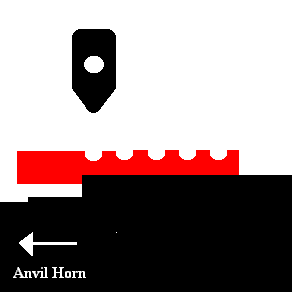
Next we want to upset one end of the bar. This is to insure we have enough material for form the bowl of the spoon later. We want to upset the bar so that the last inch is between 5/8 and ¾ inch wide. Upsetting is used to shorten the work (rod or bar stock) while increasing the height and width. You can either hold the heated end of the work against the anvil face and strike the other end with a hammer or you can clamp the work in the vice and strike the heated end directly.
 or
or 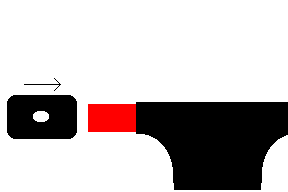
Next we will flatten our bar to reduce it’s height to about ¼ inch. This will lengthen the bar a little, and make it wider. It should be about ¾ inch wide when we are done, a little wider where we upset it.
The next step is to draw down the handle. We want to form the handle in the center of the bar’s width. See the illustrations below to see how this is done.
 |
 |
 |
|
(1) |
(2) |
(3) |
Step 4 is a repeat of step 2 on the other side. Make sure you start you handle below the portion of the bar that you upset.
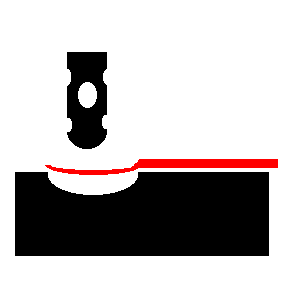
To for the bowl you first need to further thin and widen the upset end of the bar. Do this by using the peen of a cross peen hammer to put in grooves running the length of the bowl. Then use the hammer face to flatten the grooves. Repeat this as need, being sure to work only one side of the piece. We want to lower the bowl in relation to the handle. Once the bowl portion is about 3/32” thick, we need to go to the swage block. Using the peen of the ball-peen hammer sink the bowl into the smaller spoon die.
Once the bowl is formed, it’s time to finish the handle. For this project we will twist the handle and add a scrollwork detail to the end. Prior to twisting the handle, we’ll save a great deal of work later if we rough grind the handle now. Once the handle is ground good and square we will twist a section of the handle. To do this heat the spoon handle and then clamp the last inch of the handle in the vise. Using the twisting tool grab the handle about an inch below the bowl and start twisting. Don’t force the twist, if you do, you risk cracking the steel. Reheat and continue twisting as needed. Be sure you finish at an even ½ twist. Take the spoon out of the vise, reheat and taper the handle end down like a screwdriver, in the same plane as a spoon bowl. Take one last heat on the handle end and use the scroll pliers to roll the end over.
That’s it! Now you just need to take a lot of time to hand polish your spoon or a little less time to polish it using a Dremel tool.