This page still under construction, please check back often as more steps and photos are added. More photos will be added in a few days. I will be in the shop this week and photographing the hilt making process.
Last Updated 02/04/2002
Rapier Hilt
Construction Part Two,
Building a Three Ring Type Swept Hilt
Introduction
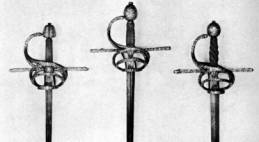
This page will detail the construction of a three ring swept hilt. This hilt is based on examples found in the Wallace Collection. These instructions assume that the reader has basic metal working skills. In order to build a hilt, the reader must be able to weld steel, or know someone who can. This is not a project for the beginning craftsman. If you are just starting hilt construction, please make sure you read the first part of these instructions, found here.
The research for this style of hilt can be found on my Function Art page. That article was written as documentation as part of an arts point at a local tournament.
Instructions
Step 1: Get your frame
You should have already completed the frame of the rapier before proceeding with these steps. Instructions for the frame construction can be reached here. Please go back and read how the build the frame. That page also includes a materials and tool list.Step 2: Form the rings of the primary bars
Once you have your frame, you need to form your rings. For the this hilt, you will (of course, ) need to form rings of varying sizes. Unlike the pappenheimer hilt, that may be built following the other set of instructions on this web site.
Clamp a piece of 1" diameter pipe in the bench vise. Heat your 1/4" bar or rod stock to a cherry red, using a forge or your torches. If you use torches, you will need to do this operation in several heats. Using your pliers, clamp the end of the heated stock to the outside of the pipe and then bend the stock around the pipe. continue this operation until you have formed a 360 degree circle around the pipe. In order to complete the circle, you will need the bend the bar slightly down so that it crosses under your starting point. Cool the piece and the repeat the process using a 2" and 3" pipe as form, until you have all three rings.
Cut the circles off of the bar leaving as small a gap as possible. Now take your circles to a hard flat surface. An anvil would be best, but a concrete floor will do in a pinch. With a hammer, gently flatten your circles. If you are using round stock, extra care is require to make sure you don't put a flat dent in your stock. While you are hammering your circles, make sure you close the gap on the smallest ring created by the saw cut.
Weld the gap closed, to create a solid ring. This weld needs to penetrate and be as clean as possible. Once this ring are welded, take it to the grinder and smooth the welds out until you have a clean unbroken ring. Leave the gaps in the other two rings alone for the time being.Step 3: Attach the first primary bar (small ring)
The primary bars go on the right hand side of the hilt. So, start out by laying the hilt frame on it's left side. Clamp the smallest ring across the gap at the end of the finger rings on the frame. Use a small set of vise grips to clamp the ring to one side of the gap while you tack weld the ring to the other side of the gap. Remove the vise grips and complete the weld on both sides of the gap.
For More Information Contact the Author via e-mail.