Scanner image of a competed billet.
The purple cast in image is a scanner artifact.
Welding a Cable Damascus Billet
This page last updated 02/04/2002
Click on thumbnail images for a larger photo
First off, I have only welded up a few pieces of cable. I do not represent myself as an expert. I'm adding this page, because I have not seen a well present tutorial on welded cable on the net. However, several good pieces on the subject exist in the print media. For more information I would direct the reader to the books by Dr Jim Hrisoulas (AKA: Master Atar in the SCA). They can be found at www.atar.com .
I was taught to weld cable by Master Damalas, http://home.earthlink.net/~chevalvolant/flyinghorseforge.html, and Master Oso, www.osoforge.com. These fine gentlemen taught me while I was attending the "Not A Hammer In" party (NAHI for short) at Master Oso's shop in October of last year. If you have an questions that I can not answer I would refer you to one of these gentlemen, or Master Atar, as listed above.
The purpose of this article is to allow a beginning smith to produce a welded cable billet. That is the starting point for making something like the spoon or dinner knife shown in my other projects gallery.
![]()
Scanner image of a competed billet.
The purple cast in image is a scanner artifact.
Preparing The Cable
The first step is to get some cable. It's important here to talk about cable or "wire rope". You want a high carbon steel cable. You want to make sure sure it is all steel and doesn't have a rope or vinyl core that will just make a mess in your forge. Good cables to use are "plow share" cable or "improved plow share" cable. If you get your cable from the scrap yard, you want used crane or elevator cable. 3/4 inch and 1 1/4 inch are good cable diameters to work with.
Once you have your cable, now you need to prepare it for use. The first step is to cut it to a workable length. My forge has a nine inch long chamber, so I work with six or seven inch long sections. To cut the cable, I use a chop saw with a metal cutting blade. Now the cable I am using right now, tends to resist coming apart, but some cables will fray when you cut them. To cut these cables you will want to wire the cable together on both sides of the area to be cut.
Once the cable is cut, some makers recommend cleaning the cable. While I have not had any problems welding the cable I have, others have reported problems with the preservatives on the cable. This preservative is made up of oil/grease and an asphalt like material.
There are two ways to clean the cable that I know of. The first is to make a super saturated borax and water solution. Then heat the cable to a dull cherry and quench the cable in the borax solution. This will burn off some of preservative and blast the rest off with any slag. It also lightly coats the wire strands in flux.
The other method of cleaning the cable is to use a solvent. For this method you need to take the cable apart into it's wire bundles. Once it's apart you need to use gasoline and a stiff brush to scrub the wire bundle down. Be sure to do this in a very well ventilated area, away from any flames. Taking this cleaning operation outside the shop would be best. Once the wire bundles area clean, it's time to reassemble the cable.
Next you need to wire the cable ends, if they aren't still wired from when you cut it. For this step I like to use stainless steel wire. Stainless steel welds at a much higher temp then high carbon steel. So after you weld the cable ends, you should be able to just cut the stainless steel wire loose from the billet. You wire the cable ends to prevent them from separating as you first weld the ends.
So now you have a cut (cleaned?) and wired piece of cable ready to weld. But what if you want to dress up the welded cable some?
Adding Nickel To Welded Cable
Damascus, or pattern welded steel, gets it beauty via etching. When you etch pattern welded steel, you get contrast between the different bands of steel (either due to different carbon content, or different alloying elements in the two steels). Welded cable is all the same steel. So how do you get a pattern. Most makers believe it is due to a slight difference in carbon introduced where the strands are welded together. However, this only tends to produce a little contrast into the finished product.
One of ways to dress up an item made of welded cable, is to add nickel to the mix. Nickel will forge weld to steel just fine (but not to another piece of nickel). When you wrap nickel around alternating wire bundles that make up a cable, the finale product will be speckled with bright spots in the scale like pattern that welded cable produces.
Most knife makers and other smiths, use strips cut from thin nickel sheets or thin nickel wire. I was having a hard time locating a local supply of nickel, so I had to use 3/32 "nickel 99", arc welding rod, from the welding supply store. To use this material I first had to break off the flux coating on the rod. I did this by lightly striking the rod with a hammer on my anvil. I used a wire brush to finish getting the flux coating off.
Once the
flux was off the rod, I then forged the rod down to a thin sheet in my propane
forge. After I forged the sheet out and let it cool, I split the sheet even
smaller by cutting down it's length with tin snips. 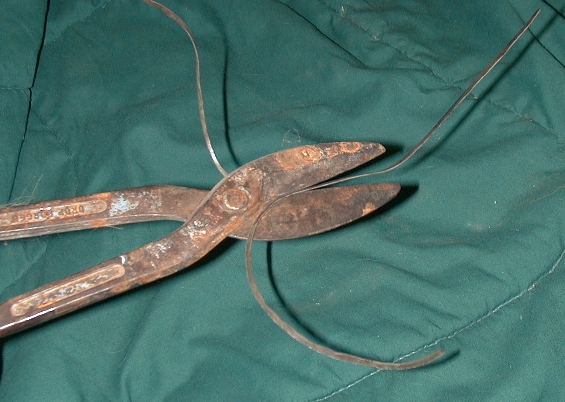
I then took my cable piece
apart into it's wire bundles. The cable I am using has seven bundles. Six
bundles are wrapped around a seventh core bundle. Because nickel won't weld to
nickel, I wrapped ever-other one of the out side bundles. That way there is no
way the nickel will touch nickel during welding. I then reassembled the cable
piece as best as I could and wired the ends tight to hold it all together. 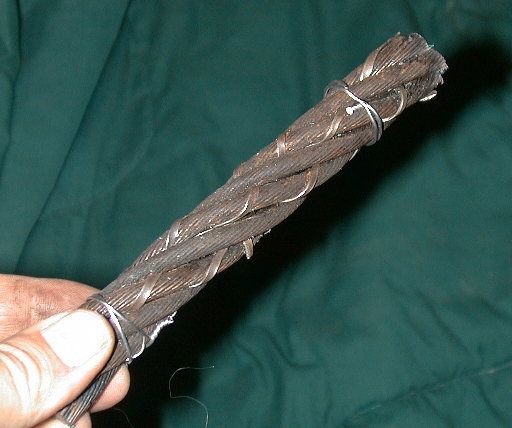
Welding the Cable
The first welding course
Now that you have prepared the piece of
cable, it's time to weld it. These instructions will assume you are using a gas
forge, like I do. If you use a coal forge, these instructions will still work,
with minor changes. The first step is to weld the two ends. Use the same
procedure on both ends.
Start your forge and a let it come up to a welding
heat. Stick the cable into the forge, leaving one end sticking out for your
tongs to grab. Try to only heat the end you are working on. The fewer heats that
any portion of the cable receives, the better.
Once the cable end is nice and red (as seen under shop
light, not day light), take it out and add flux. For flux I use plain Anhydrous
Borax. Other smiths may use other "mixes" but I find the Borax does a
good job without introducing any "crap" into the weld. When adding the
flux it is almost impossible to add too much. However, too much creates a mess. Sprinkle
the flux on until a light powder coating sticks to the cable. Once that melts in
the forge, you should see a thin "wet" coating on all the wires.
Once the piece is fluxed, return it to the forge. You now
need to heat the piece to a welding temp. Cable welds in the yellow color range.
But color is hard to gauge in all lighting situations. So watch the flux. Wait
for the flux to bubble, then watch for the bubbles to "dance" over the
surface of the cable. Now wait a touch more, to make sure you are at the same
heat all the way through the cable.
Quickly use your tongs to take your cable from the forge to
the anvil, you only have a little bit of time to work at a welding heat
("strike while the iron is hot" means exactly that to the would be
smith). Lightly strike the end with a 3 pound or so hammer. Turn the cable
between blows, you always want to work the cable round while welding. As you hit
the cable you should be able to feel the weld take, back through the hammer
handle. If the weld sticks, you will feel some resistance. If the cable is too
cold you will just feel the end of the cable mush. As more and more of the cable
welds, you will feel more and more of the blows energy came back through the
handle. In one heat you should be able to weld about one inch of length on a
3/4" cable.
Once you reach a red heat, stop hitting the piece. Now use
your wire brush to remove any scale from the welded section. So long as you are
at red heat the scale should brush right off. Any cooler and the scale will not
come loose. If you didn't get the end completely welded, reflux the end and
return it to the forge. Repeat the last steps until the end of the cable is
completely welded all the way around.
Put the cable down on your anvil and let go with the tongs.
Now grasp the cable, with the tongs by the end you just welded. Return the cable
to the forge sticking the un-welded end into the forge (don't forget to cool
your tongs, by dunking the jaws in your slack bucket). Repeat the heating,
fluxing and welding steps above until both ends are completely welded.
Once the ends are welded, it's time for a little twisting to
tighten up the pattern and make welding a little easier. Put the entire piece of
cable in the forge. Heat the cable until it is in the red color range. Take the
cable out and lightly flux the entire length. Put the cable back in the forge
and bring it up to a yellow heat. Take the cable out and quickly clamp one end
in the vise and twist the other end with a special wrench or Visegrips. During
this twisting some strands may actually weld. Some scale will also flake off
during the twisting, so don't stand too close to the vise (scale may look black
and cool, but don't let that fool you, it's hot!). Don't twist so hard that you
shear the piece (you will feel any strands break).
Take the cable from the vise and lightly wire brush it. Then
pick an end and flux it for about an inch above the end weld. Return it to the
forge, putting the fluxed end into the fire. Repeat the steps above for welding
the ends on this section of cable. Repeat as needed to weld the whole billet.
Once your weld reach the center of the cable turn it around, but keep weld
working down the cable in the same direction (so that you finish at the opposite
end of the cable from where you started).
That complete the first course of welding.
The Second Welding Course
You run the billet through
a second welding course to make sure it's welded, tighten up the pattern and
clean up the billet surface.
After the billet is wire brushed from the final weld above,
lightly flux the entire thing. Return the billet to the forge and bring it up to
a welding heat. Take the billet out of the forge and quickly clamp one end in
your vise. Grab the other end with you twisting wrench or Visegrips. Twist the
billet as tightly as you can without shearing any welds (this may take more then
one heat). After you twist the billet take it out of your vise, wire brush it
and lightly flux it again. Return the billet to the forge.
When the billet reached welding heat (watch for the boiling
flux to "dance" over the piece), take it out and work and inch or two
length with firm hammer blows while turning the piece. Only work the metal while
it's at welding heat. Once the billet drops into the red color range, stop
striking it with the hammer (the hard thing to do is resist taking just one more
blow). Wire brush while the billet is in the red range, reflux it and
return it to the forge. Repeat as need until you have run the second weld course
over the entire length of the billet.
Too be continued.......................
![]()
Scanned, welded billet. the purple cast
in image is a scanner artifact.
(yup, I just slapped the billet on the scanner bed)
For More Information Contact the Author via e-mail.